Postcard #29 Snowmen Ornaments
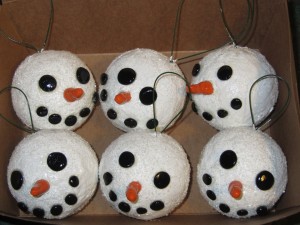
This Christmas I made ornaments. 18 of them. I started in early November and finally completed my last one two days before Christmas (there’s nothing more special or fun than spraying clear coat in a cold garage and waiting for the smell to dissipate before wrapping up the ornaments). Even though making the ornaments was a long process, I really did have a fun time and I’m already thinking of what I will do for next year!
Here’s what I did:
The materials are available at Joanne’s Fabrics, Michaels pretty much at any craft store. For the ornaments, you will need:
Clay Mache- This stuff is the BEST! It smells like sugar cookie dough (I sniffed it a lot while making the ornaments) and it sort of tastes like sugar cookie dough too (I licked it on a dare). Half of the ornaments are made from the Clay Mache stuff while the other half is made from instant paper mache which is fine, but you have to let it dry and sand it and then paint it and it gets to be a HUGE pain in the neck! Be smart and stick with the Clay Mache (about $7.00 from Michaels, you’ll be glad you did!
Medium Styrofoam balls (I bought a pack of 6)
Fimo or another type of clay that you bake. I bought one package of orange for the carrot noses and black for the eyes and mouth.
Wire for the loop at the top of the head and I also used a very small piece to attach the nose to the styrofoam head. Wire cutters.
White craft paint, a whole Lotta glitter, some craft glue (not the hot glue kind), and spray shellac. Before I found the Clay Mache I was sanding the paper mache heads, painting them white and then spraying glitter spray on them.
Cute holiday ribbon and for extra credit, you can get the little wooden disks, drill a hole through each one, paint it red (or whatever color you choose), write the date as well as the lucky recipient’s name and attach it to the loop it will hang from
Little dishes for the heads to dry.
Here’s what you do:
Make the Fimo clay noses, eyes, and mouths and bake according to the directions. I made mine while watching TV and it was a fast process. Be sure to use a little piece of wire to make a hole in the base of the nose and be sure not to bake the wire with the noses (I stuck the wire in later). When you bake the clay, make sure not to sniff the fumes because it is a plastic based material and you could lose your sense of smell (okay, not really).
Make a loop for the top of the snowman head and attach the nose to the head with a small piece of wire. I twisted the two endstogether after I made the loop and shoved it securely into the snowman’s head.
Knead a small piece of the Clay Mache, sort of warming it up between your fingers flatten it out and press it onto the styrofoam ball, I added a bit more around the nose and loop so it would be a bit stronger. Continue this process until the entire surface is covered. Make sure to give it a sniff, doesn’t it smell like sugar cookie dough? Yum. Be sure to smooth it as you go, but don’t worry about making it perfect-the imperfections are part of the charm!
Let it dry! This should take about 24 hours- I hung mine from a shower rod with yarn and it seemed to work just fine.
Grab your white craft paint and go to town! While the paint is still wet, glob some glitter all over it and let it dry. Worried that all that shiny sparkly loveliness will fall off? Don’t be! You’ll be spray shellacing the hell out of it later and that will keep it from going anywhere!
Let it dry (I hung mine back up on the shower rod) at least overnight.
Gently glue (using craft glue) the black Fimo eyes and mouth on your snowman (I used 5 pieces for the mouth) and then I put it in a dish to dry and I checked it every once in a while to make sure the eyes and mouth were still in the right place. I had nightmares that the eyes and mouth had completely slid and then dried in the wrong place- who knew crafting could be so stressful?
After your ornament is completely dried, find a place with great ventilation and spray shellac the hell out of it! I used two coats (I like shiny things) and let it dry and air out at least overnight (I sprayed mine in the garage and it was perfect!).
Attach any cute ribbon or little wooded disk (see above for complete direction about this part) and viola! You’re done! hand them out to your friends and any other deserving people!
Merry (late!) Christmas and Happy New Year!
Cindy
Read Full Post | Make a Comment ( None so far )


You must be logged in to post a comment.